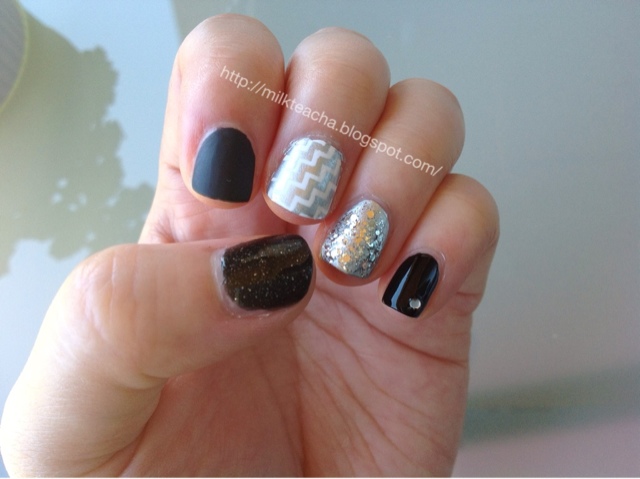
This nail design required a little more tools but it is still easier than it looks. I combined glitter, matte surface, stamping, and rhinestones in one nail designs. I don't want it to be too busy so I kept it simple by using black, white and silver only. I used Konad stamper to do my middle finger but if you don't have a stamper, you can use a nail art pen. I am not very good at free hand nail art, so I prefer stamping ^^
Apply base coat to all your nails.
Thumb: 1. Apply 2 coats of black glitter polish.
Index finger: 1. Apply 2 coats of black cream polish.
Middle finger: 1. Apply 2 coats of white cream polish.
2. Using the konad stamper, stamp an angled chevron on your nail with a silver polish.
Ring finger: 1. Apply 1 coat of silver polish.
2. Apply silver glitter polish until you get the desired bling.
Pinky: 1. Apply 2 coats of black polish.
2. Put a tiny drop of top coat to the corner of your nail where you want your rhinestone at.
3. Use a stick to set the stone on your nail. Press down firmly.
Finish with top coat except your index finger. Instead of the glossy top coat, apply a matte top coat on your index finger.
Remember to let them dry thoroughly between layers.

Polishes used:
Black glitter polish: L'Oreal Diamond Collection drop dead gorgeous 601
Black ceam polish: China glaze liquid leather 544
Matte top coat: Essie matte about you
White cream polish: China glaze white out 545
Silver polish: Sally Hansen Insta-dri silver sweep 230
Silver glitter polish: Essie luxeffects set in stones
Stamping plate: Mash-45
Rhinestone: clear 1.5mm round

As a lot of other people have recommended, Sally Hansen Insta-dri silver sweep is one excellent stamping polish. It is a must have for people who like stamping like me.
Thank you for reading. I hope you will like my design and find it useful. If you have any questions, comments or suggestions, please leave me comments below. Have a wonderful day! ❤
(I am not paid and all the materials I used in this post were bought using my own money.)
No comments:
Post a Comment