Showing posts with label Sally Hansen. Show all posts

Friday, April 4, 2014

Fall Nail Design: The Earth


Fall Nail Design: The Earth tutorial

I know it is not fall at all. I am truly sorry about it, but I have so many nail designs piled up in my computer waiting for their own spot on this blog. Please bare with me.

Today I am back in business, sharing with you an earthy natural tone nail design with nude and taupe polish. To achieve this look, you will need a nude polish, a taupe polish, a white polish, a gold polish, some gold striping tape, some Scotch tape and some gold studs. Alternatives will be mentioned below. 

Fall Nail Design: The Earth


1. First, apply base coat to all your nails.
2. Apply white polish to the ring finger. Apply nude polish to all other fingers. I only did the tips in my photo. You can do the whole nail if you like. I am just lazy.

Fall Nail Design: The Earth base color

3. On your thumb, put a corner of a piece of Scotch tape at the tip.
4. Apply taupe polish.
5. Carefully remove the Scotch tape.
6. Repeat 3-5 with all other fingers except the ring finger.

Fall Nail Design: The Earth thumb
With Scotch tape
Fall Nail Design: The Earth thumb
Apply taupe polish
Fall Nail Design: The Earth thumb
Scotch tape removed

7. Use a pair of tweezers to add two strips of gold striping tape at the edge as shown.
8. Add a square gold stud diagonally at the corner.

Fall Nail Design: The Earth thumb
Add gold striping tape
Fall Nail Design: The Earth thumb
Add square gold stud

9. For your ring finger, it is pretty much the same as the thumb. The only difference is it is a reversed version. Cover your nail with a piece of Scotch tape leaving only a small triangle at the tip.
10. Apply gold polish at the tip.
11. Carefully remove the tape.
12. Add stripping tape and gold stud.

Fall Nail Design: The Earth ring finger
With Scotch tape
Fall Nail Design: The Earth ring finger
Apply gold polish
Fall Nail Design: The Earth ring finger
Scotch tape removed
Fall Nail Design: The Earth ring finger
Add striping tape and gold stud. Apply matte top coat.

12. Apply matte top coat to all of your nails and you are done.

Fall Nail Design: The Earth finished

Remember to let the polishes dry completely before putting tapes on them. You can apply a thin coat of fast drying top coat before taping if you like. Before taping, stick the Scotch tape to your hand several times to reduce the stickiness of it. If you make mistakes, use a nail art pen to fix it. It doesn't matter if the edge is not perfect. A good top coat will smooth it out. You can apply a thin layer of clear top coat before applying matte top coat. You will have a smoother finish this way, but more layers means it will peel off easier.

Some alternatives:
No gold studs? Use a dotting tool or a bobby pin with some gold polish.
No stripping tape? Use a nail art pen or liner with some gold polish to draw a thin line. 
No matte top coat? Use a clear top coat. However, I think the matte finish do add an earthy feel to it which is the theme of this nail design.

Things used:
Nude polish: Loreal park ave luncheon 201
Taupe polish: Essie case study 765
Gold polish: Sally Hansen Xtreme wear Golden-I 485
White polish: china glaze White out 545
Matte top coat: Essie matte about you
3mm square gold studs
gold striping tape

Thing used in Fall Nail Design: The Earth
Things used for Fall Nail Design: The Earth

Thank you very much for reading. I hope you like my post and find it useful. Please follow my blog. Also on pinterest and instagram. Thank you.

(I am not paid and all the materials I used in this post were bought using my own money.)

Thursday, October 17, 2013

Simple yet Chic


Today I am going to share a very simple design. A pale pink mixed with dark brown with a champagne gold accent. To achieve this look, you will need a pale pink polish, a dark brown polish, a champagne gold glitter polish, some Scotch tape and some gold studs. Alternatives will be mentioned below.

Simple yet Chic nails

1. First, apply base coat to all your nails.
2. Apply pink polish to the thumb, index and middle finger. Apply champagne glitter to the ring finger. Apply brown polish to pinky.

Base color of the Simple yet Chic nails

3. Put several strips of Scotch tape on your index finger as shown below. Apply brown polish on it. Remove the tapes carefully.

Scotch tape on index finger

Scotch tape removed
Scotch tape removed

4. Use a stick and some clear polish to set the studs on your middle finger to form a straight line on the left side of your nail as shown below.

Set gold studs on middle finger

5. Apply top coat to all of your nails and you are done.

Finished Simple yet Chic nails

Remember to let the polishes dry completely before putting tapes on them. You can apply a thin coat of fast drying top coat before taping if you like. Before taping, stick the Scotch tape to your hand several times to reduce the stickiness of it. If you make mistakes like I did, use a nail art pen to fix it. It doesn't matter if the surface is uneven. A good top coat will smooth it out.

Some alternatives:
No champagne gold glitter and dark brown polish? Use a regular gold glitter and Black polish.
No gold studs? Use a dotting tool or a bobby pin with some gold polish.
No Scotch tape? Use a nail art pen to draw the border line. I do recommend using Scotch tape because it is so much easier.

Things used:
Pink polish: Sally Hansen insta-dri Petal Pusher 150
Brown polish: Essie little brown dress 728
Champagne glitter polish: china glaze champagne kisses 1114
2mm round gold studs

Things used in the Simple yet Chic nails

Below is a graphic version of this tutorial. Hope you will like it.

Simple yet Chic nails tutorial

Thank you very much for reading. I hope you like my post and find it useful. Please follow my blog. Also on pinterest and instagram. Thank you.

(I am not paid and all the materials I used in this post were bought using my own money.)

Tuesday, October 15, 2013

Fall nail design: Purple and Teal French Tip


Sorry for not updating for a while. In fact, I have been busy with some remodeling of my house. Now I am done with painting the walls. It's time for me to go back with painting my nails. ^^

About a month ago, I bought 2 nail polishes from the China Glaze Fall 2013 Autumn Nights Collection. One of them is a dark blue creme called Queen B. The other one is this dark purple creme called charmed, I'm sure. I like the color very much. It's deep and dark and is the perfect color for fall. So I decided to do a nail design with it and came up with this Purple and Teal French Tip I am going to share with you today. A color contrast between purple and teal with a little bit of sparkles. I chose to do a French Tip twist because I wanted to keep it simple and let the colors be the focus. I hope you will like it.

Purple and Teal French Tip
 
To achieve this look, you will need a dark purple creme polish, a teal polish, a silver polish (optional), a silver glitter polish and some Scotch tapes. It is always hard to get a even coat of glitter polish especially those with the larger flakes. Putting a coat of silver polish underneath will make it look more even and opaque.

1. First, apply base coat to all your nails.
2. Apply teal polish to the thumb, middle finger and pinky. Apply purple polish to the index finger. Apply silver polish to the ring finger.
3. Apply silver glitter on the ring finger on top of the silver polish.
4. On your thumb, put a piece of Scotch tape on your nail leaving the bottom 1/4 of your nail uncovered. Paint the uncovered part with teal polish. Carefully remove the tape.
5. On your index finger, put a piece of Scotch tape on your nail leaving the tip uncovered. Paint the tip with teal polish. Carefully remove the tape.
6. On your middle finger, put a piece of Scotch tape on your nail diagonally. Paint the uncovered part with purple polish. Carefully remove the tape.
7. On your ring finger and pinky, put a piece of Scotch tape on your nail leaving the tip uncovered. Paint the tip with purple polish. Carefully remove the tape.
8. Go back to your middle finger, use a piece of Scotch tape on your nail leaving the tip uncovered. Paint the tip with silver polish. Carefully remove the tape. Apply silver glitter on top of the silver polish.
9. Apply top coat to all of your nails.

Purple and Teal French Tip

Remember to let the polishes dry completely before putting tapes on them. You can apply a thin coat of fast drying top coat before taping if you like. Before taping, stick the Scotch tape to your hand several times to reduce the stickiness of it. Don't bother about getting a super clean edge. A good layer of top coats will fix it.

Things used:
Purple polish: china glaze charmed, I'm sure 1232
Teal polish: Sephora by OPI Ocean Love Potion SE 283
Silver polish: Sally Hansen Insta-Dri Silver Sweep 230
Silver glitter polish: Essie luxeffects set in stones 958

Polishes used in the Purple and Teal French Tip

Thank you very much for reading. I hope you like my post and find it useful. Please follow my blog. Also on pinterest and instagram. Thank you.

(I am not paid and all the materials I used in this post were bought using my own money.)

Wednesday, August 28, 2013

Multi color with DIY velvet

This is just a random multi color nail design I did last week. I made a DIY velvet on my middle finger. I love to put different colors and textures together. To create this look, you will need a white creme polish, a sandy beige creme polish, a light blue polish, a dark brown creme polish, a gray creme polish, a gold shimmer polish, a stamper and a plate or nail art pen, a gold stud and some white velvet powder. I know it looks like a lot, but you can always have alternatives. Sorry for the super low quality of the photos. In these photos, the large white flower on my index finger doesn't really show because i used a wrong white polish to stamp. I actually got a better result with another white polish on my right hand which I should have taken photos of but I didn't.


1. Apply base coat to all fingers.
2. Apply beige polish to your thumb.
3. Apply light blue polish to you index finger.
4. Apply white polish to your middle and ring finger.
5. Apply gold shimmer polish to your pinky.
6. Put a tiny drop of clear polish on your thumb where you want your stud at. Use a stick or toothpick to set a gold stud on it.
7. Use a Konad stamper to stamp a flower on your index finger with white polish. Then, stamp a smaller flower with dark brown polish, overlapping part of the white flower.
8. On the ring finger, use striping tape to make a pattern of your choice. Use a dotting tool to fill in the gaps with all four colors, beige, dark brown, gray and gold. Remove the stripping tapes carefully.
9. Apply top coat to all your fingers except your middle.
10. Apply a coat of white polish on your middle finger. Before it dries, use a tong to pick up the white velvet powder and release them right on your nail. Repeat for any bald spots. You can gently tap your finger to shake off the excess but do not touch it until it dries. After it dries, use a brush to brush off the excess. Do not apply top coat because it will ruin the fluffy velvet texture.


The velvet nail will only last for a day or two. Just like other textured nails, I prefer doing them on ring finger or pinky. Avoid using your ring finger and pinky is so much easier than your other three fingers. This time I did the middle ones though. Don't worry about washing your hands because it doesn't affect the result that much. Of course, you will lose some velvet powders but you will lose them eventually no matter if you wash your hands or not. 

For the alternatives:
No velvet powder? Paint your middle finger with white creme polish. Add a gold stud on it.
No gold stud? Use a dotting tool to put a tiny drop of gold shimmer polish instead.
No Konad stamper? Use nail art pen to draw the flowers on your nail.
No striping tape? Use scotch tape and cut them into very thin strips.

Things used:
Sandy beige polish: Essie yogaga 949
Light blue polish: Essie borrowed & blue 746
White polish (also used for stamping): Sally Hansen Xtreme wear white on 300
Dark brown polish: Essie little brown dress 728
Gray polish: Ulta concrete evidence
Gold shimmer polish: Sally Hansen Xtreme wear Golden-I 485
Stamping plate: Konad m60 (sorry, I forgot to include this one in the picture)
White velvet powder, 5mm heart shaped gold studs


Thank you very much for reading. I hope you like my post and find it useful. Please follow me on pinterest or instagram to keep you updated. Thank you.

(I am not paid and all the materials I used in this post were bought using my own money.)

Wednesday, August 14, 2013

Marc by Marc Jacobs bracelet inspired


This is a nail design inspired by the Marc By Marc Jacobs exploded bow bracelet. I love the bracelet and wear it a lot. One day I thought maybe I could do a nail design complementing the bracelet. This time I did the caviar nail on my pinky just for fun. If you don't have the supplies, you can simply apply silver polish instead.

Marc by Marc Jacobs Exploded Bow bracelet
Marc-by-Marc-Jacobs-bracelet-inspired-nails-1
Marc by Marc Jacobs bracelet inspired nails


1. Apply base coat to all nails.
2. Apply brown shimmer polish to your thumb.
3. Apply off white cream polish to your index and middle fingers.
4. Apply copper glitter to your ring finger.
5. Apply a thick coat of clear polish or silver polish to your pinky. Gently pour the silver microbeads onto your nail. Use your finger or a stick to pat down the beads very gently. Wait for it to dry completely.
6. Put a tiny drop of clear polish on your index finger. Use a stick or toothpick to set a rhinestone on it.
7. Use a Konad stamper to stamp a bow on your middle finger with a silver polish.
8. Paint a dot in the center of the bow with the copper glitter polish.
9. Apply top coat to all your nails.

Marc-by-Marc-Jacobs-bracelet-inspired-nails-2
Marc-by-Marc-Jacobs-bracelet-inspired-nails


Things used:
Brown shimmer polish: Essie mochacino 672
Silver polish for stamping: Sally Hansen Insta-dri silver sweep 230
Silver microbeads
Off-white polish: My own franken polish (because I don't have an off white polish, I made my own by mixing up some yellow and white polish.)
Copper glitter (Again, I don't have a copper glitter polish. I used clear polish with copper glitter)
Rhinestone: clear 1.5mm round
Stamping plate: QA-36 (I got this from an online nail supplies store)

Marc-by-Marc-Jacobs-bracelet-inspired-nails-tutorial

I really like how the colors and the textures complement each other. I hope you like it as much as I do. The caviar actually lasted longer than I thought. A couple of beads did fall off though. So, be careful when you are preparing foods or eating with your hands. For people who wants to know more about stamping and caviar nail, I might have a post about them in the near future. Thank you very much for reading. 

(I am not paid and all the materials I used in this post were bought using my own money.)


Tuesday, August 13, 2013

Black and white

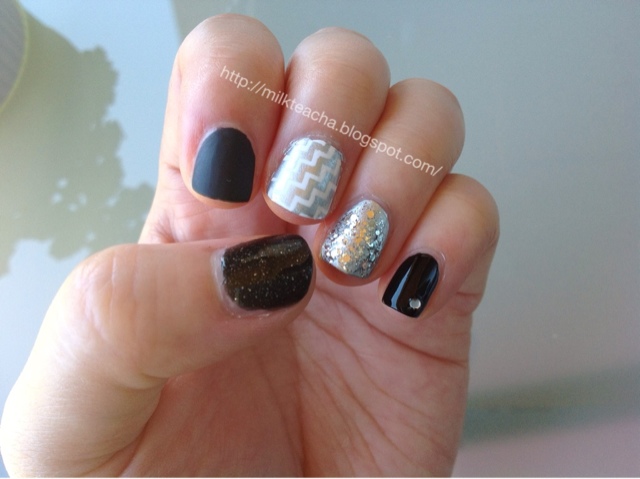
This nail design required a little more tools but it is still easier than it looks. I combined glitter, matte surface, stamping, and rhinestones in one nail designs. I don't want it to be too busy so I kept it simple by using black, white and silver only. I used Konad stamper to do my middle finger but if you don't have a stamper, you can use a nail art pen. I am not very good at free hand nail art, so I prefer stamping ^^ 


Apply base coat to all your nails.
Thumb: 1. Apply 2 coats of black glitter polish.
Index finger: 1. Apply 2 coats of black cream polish.
Middle finger: 1. Apply 2 coats of white cream polish.
                      2. Using the konad stamper, stamp an angled chevron on your nail with a silver polish.
Ring finger: 1. Apply 1 coat of silver polish.
                   2. Apply silver glitter polish until you get the desired bling.
Pinky: 1. Apply 2 coats of black polish.
           2. Put a tiny drop of top coat to the corner of your nail where you want your rhinestone at.
           3. Use a stick to set the stone on your nail. Press down firmly.
Finish with top coat except your index finger. Instead of the glossy top coat, apply a matte top coat on your index finger.
Remember to let them dry thoroughly between layers.


Polishes used:
Black glitter polish: L'Oreal Diamond Collection drop dead gorgeous 601
Black ceam polish: China glaze liquid leather 544
Matte top coat: Essie matte about you
White cream polish: China glaze white out 545
Silver polish: Sally Hansen Insta-dri silver sweep 230
Silver glitter polish: Essie luxeffects set in stones
Stamping plate: Mash-45
Rhinestone: clear 1.5mm round


As a lot of other people have recommended, Sally Hansen Insta-dri silver sweep is one excellent stamping polish. It is a must have for people who like stamping like me.

Thank you for reading. I hope you will like my design and find it useful. If you have any questions, comments or suggestions, please leave me comments below. Have a wonderful day! ❤


(I am not paid and all the materials I used in this post were bought using my own money.)