Showing posts with label Loreal. Show all posts

Friday, April 4, 2014

Fall Nail Design: The Earth


Fall Nail Design: The Earth tutorial

I know it is not fall at all. I am truly sorry about it, but I have so many nail designs piled up in my computer waiting for their own spot on this blog. Please bare with me.

Today I am back in business, sharing with you an earthy natural tone nail design with nude and taupe polish. To achieve this look, you will need a nude polish, a taupe polish, a white polish, a gold polish, some gold striping tape, some Scotch tape and some gold studs. Alternatives will be mentioned below. 

Fall Nail Design: The Earth


1. First, apply base coat to all your nails.
2. Apply white polish to the ring finger. Apply nude polish to all other fingers. I only did the tips in my photo. You can do the whole nail if you like. I am just lazy.

Fall Nail Design: The Earth base color

3. On your thumb, put a corner of a piece of Scotch tape at the tip.
4. Apply taupe polish.
5. Carefully remove the Scotch tape.
6. Repeat 3-5 with all other fingers except the ring finger.

Fall Nail Design: The Earth thumb
With Scotch tape
Fall Nail Design: The Earth thumb
Apply taupe polish
Fall Nail Design: The Earth thumb
Scotch tape removed

7. Use a pair of tweezers to add two strips of gold striping tape at the edge as shown.
8. Add a square gold stud diagonally at the corner.

Fall Nail Design: The Earth thumb
Add gold striping tape
Fall Nail Design: The Earth thumb
Add square gold stud

9. For your ring finger, it is pretty much the same as the thumb. The only difference is it is a reversed version. Cover your nail with a piece of Scotch tape leaving only a small triangle at the tip.
10. Apply gold polish at the tip.
11. Carefully remove the tape.
12. Add stripping tape and gold stud.

Fall Nail Design: The Earth ring finger
With Scotch tape
Fall Nail Design: The Earth ring finger
Apply gold polish
Fall Nail Design: The Earth ring finger
Scotch tape removed
Fall Nail Design: The Earth ring finger
Add striping tape and gold stud. Apply matte top coat.

12. Apply matte top coat to all of your nails and you are done.

Fall Nail Design: The Earth finished

Remember to let the polishes dry completely before putting tapes on them. You can apply a thin coat of fast drying top coat before taping if you like. Before taping, stick the Scotch tape to your hand several times to reduce the stickiness of it. If you make mistakes, use a nail art pen to fix it. It doesn't matter if the edge is not perfect. A good top coat will smooth it out. You can apply a thin layer of clear top coat before applying matte top coat. You will have a smoother finish this way, but more layers means it will peel off easier.

Some alternatives:
No gold studs? Use a dotting tool or a bobby pin with some gold polish.
No stripping tape? Use a nail art pen or liner with some gold polish to draw a thin line. 
No matte top coat? Use a clear top coat. However, I think the matte finish do add an earthy feel to it which is the theme of this nail design.

Things used:
Nude polish: Loreal park ave luncheon 201
Taupe polish: Essie case study 765
Gold polish: Sally Hansen Xtreme wear Golden-I 485
White polish: china glaze White out 545
Matte top coat: Essie matte about you
3mm square gold studs
gold striping tape

Thing used in Fall Nail Design: The Earth
Things used for Fall Nail Design: The Earth

Thank you very much for reading. I hope you like my post and find it useful. Please follow my blog. Also on pinterest and instagram. Thank you.

(I am not paid and all the materials I used in this post were bought using my own money.)

Tuesday, September 24, 2013

Japanese Style Rabbits


Last Thursday was the Mid-Autumn festival. I wanted to do something related to it so I did this Japanese style rabbits nail design. This design again requires some free hand techniques that I am so bad at. Please excuse me for my ugly drawings. And I kind of cheated by using the Sally Hansen Nail Art pen to draw. The result wasn't very good. It looks like I used correction pen to draw. You can see the rabbit I drew with it cracked after I put on the matte top coat. So, I recommend using the traditional method, a nail art pen and a white polish. :( No shortcut this time.

Japanese style rabbits nail
Japanese Style Rabbits Nail

To achieve this look, you will need a pink polish, a white polish, a red polish, a gold glitter polish, a matte top coat (optional) and some nail art pens. I found out I don't have a pink creme polish, so I used a pink jelly instead. I did several coats to make it opaque and it turned out pretty good.

1. First, apply base coat to all your nails.
2. Apply pink polish to the thumb, index finger and pinky. Apply red polish to the middle finger. Apply white polish to the ring finger.

Base colors of the Japanese style rabbits

3. Apply gold glitter polish sparingly to the thumb and middle finger.
4. Use a nail art pen and a dotting tool to draw some sakuras and rabbits on your nails with red and white polish.
Japaneses Style Rabbits nail tutorial
(click the image to enlarge)

5. Draw a sakura on your thumb similar to your pinky and add an extra petal.
Japaneses Style Rabbits nail
finished drawings without top coats

6. Apply top coat to all of your nails except the middle one.
7. Apply matte top coat to your middle finger (optional). It is totally OK to use normal glossy top coat.


Because my free hand drawing was too bad, I didn't do a step by step tutorial with my nails. Instead, I made a tutorial with computer drawings. I think it will be easier to understand. 

Japanese style rabbits nail tutorial
step by step tutorial of the Japanese Style Rabbits

Things used:
Pink polish: Loreal bubble trouble 605
Red polish: wet n wild Wild Shine red red 414A
White polish: Essie marshmallow 63
Gold glitter polish: Milani gold 531
Matte top coat: Essie Matte about you

Polishes used in the Japanese style rabbits

Thank you very much for reading. I hope you like my post and find it useful. Please follow my blog. Also on pinterest and instagram. Thank you.

(I am not paid and all the materials I used in this post were bought using my own money.)

Wednesday, September 4, 2013

Nude peach with colors and hearts


This time I did a nail design based on a nude peach creme polish. I added some white, some black, some mint, some glitter and gold. I got a lot of complements on these. I hope you will like it also. This design does require a little bit of free hand technique which I am so bad at. Please excuse me for my not so perfect drawings. And I made a mistake by putting on top coats before the polishes dried. You can see my black heart is bleeding... Remember to let them dry thoroughly before putting on top coats.


Nude Peach with Colors and Hearts 


To achieve this look, you will need a nude peach creme polish, a mint creme polish, a white creme polish, a black creme polish, a black nail art liner or nail art pen with black polish, a silver or gold glitter, a silver or gold stud and some striping tapes or some more nail art pens.

Nude Peach with Colors and Hearts tutorial


First, apply base coat to all your nails.
1 & 2. Apply nude peach polish the thumb, index finger and pinky. Apply mint polish on the middle finger. Apply white polish to the ring finger.
3. Paint the upper left corner of the index finger white. Draw two curves at the edge as shown in the photo. Use a dotting tool to draw polka dots on the middle finger with white polish. Use striping tape on the ring finger. Skip the striping tape if you are using nail art pen instead.
4. Fill in the gaps with mint polish, nude peach polish and glitter polish. Or you can simply use nail art pen to draw thin lines on the ring finger.
5. Draw a heart with black polish on the thumb.
6. Put a tiny drop of clear polish in the center of the pinky. Use a stick or tooth pick to set the stud on it.
7. Use a nail art liner or nail art pen with black polish to draw a loop with a heart on the index finger.
8. Finish with top coats.

Nude Peach with Colors and Hearts


The most difficult part is drawing the loop, especially with your left hand. I used a very fine point dotting tool to help when I did my right hand. And I found it easier to use a liner to draw lines than using striping tapes. If executed perfectly, the striping tape method gives you clean and striaght lines. However, it requires more work and time, and you have to work fast because it is hard to cleanly remove the tapes after the polishes dry. So, I think it might be better to draw the lines directly on the nail with some nail art pens. When I was choosing the color palatte of this design, I couldn't decide on gold or silver glitter. They both look good with other colors. So, I chose this sparklicious by Loreal which has both gold and silver glitter in it. That is why I said you need a gold or silver glitter polish. This is really up to you. Remember to use a matching stud on your pinky.

Thing used:
Nude peach polish: Essie a crewed interest 790
Black polish: wet n wild Wild Shine black creme 424A
Black nail art liner (optional): Sinful Colors black
Mint polish: china glaze re-fresh mint 867
White polish: wet n wild Wild Shine 449C
Glitter polish: Loreal sparklicious 605
5mm heart shaped gold studs

Essie a crewed interest nail polish


Thank you very much for reading. I hope you like my post and find it useful. Please follow me on pinterest and instagram to keep you updated. Thank you.

(I am not paid and all the materials I used in this post were bought using my own money.)

Tuesday, August 13, 2013

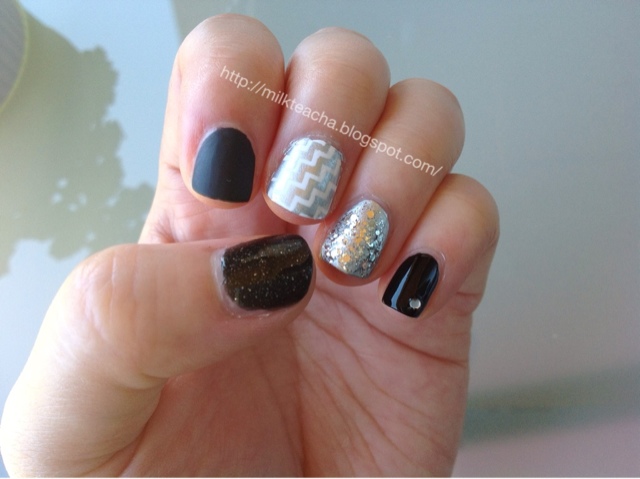
Black and white

This nail design required a little more tools but it is still easier than it looks. I combined glitter, matte surface, stamping, and rhinestones in one nail designs. I don't want it to be too busy so I kept it simple by using black, white and silver only. I used Konad stamper to do my middle finger but if you don't have a stamper, you can use a nail art pen. I am not very good at free hand nail art, so I prefer stamping ^^ 


Apply base coat to all your nails.
Thumb: 1. Apply 2 coats of black glitter polish.
Index finger: 1. Apply 2 coats of black cream polish.
Middle finger: 1. Apply 2 coats of white cream polish.
                      2. Using the konad stamper, stamp an angled chevron on your nail with a silver polish.
Ring finger: 1. Apply 1 coat of silver polish.
                   2. Apply silver glitter polish until you get the desired bling.
Pinky: 1. Apply 2 coats of black polish.
           2. Put a tiny drop of top coat to the corner of your nail where you want your rhinestone at.
           3. Use a stick to set the stone on your nail. Press down firmly.
Finish with top coat except your index finger. Instead of the glossy top coat, apply a matte top coat on your index finger.
Remember to let them dry thoroughly between layers.


Polishes used:
Black glitter polish: L'Oreal Diamond Collection drop dead gorgeous 601
Black ceam polish: China glaze liquid leather 544
Matte top coat: Essie matte about you
White cream polish: China glaze white out 545
Silver polish: Sally Hansen Insta-dri silver sweep 230
Silver glitter polish: Essie luxeffects set in stones
Stamping plate: Mash-45
Rhinestone: clear 1.5mm round


As a lot of other people have recommended, Sally Hansen Insta-dri silver sweep is one excellent stamping polish. It is a must have for people who like stamping like me.

Thank you for reading. I hope you will like my design and find it useful. If you have any questions, comments or suggestions, please leave me comments below. Have a wonderful day! ❤


(I am not paid and all the materials I used in this post were bought using my own money.)